Implementing a Secure Network Design
In this activity, we will configure an internal Windows webserver for HTTPS connectivity, providing a secured connection to an internal web application.
In part two, we will configure DHCP security settings, including Authorization, an IP address reservation, and audit logs.
Request Server Certificate
Task: Use IIS Manager to request a certificate for the web server, using the common name "updates.corp.515support.com." The certificate is used to provide a secure connection.
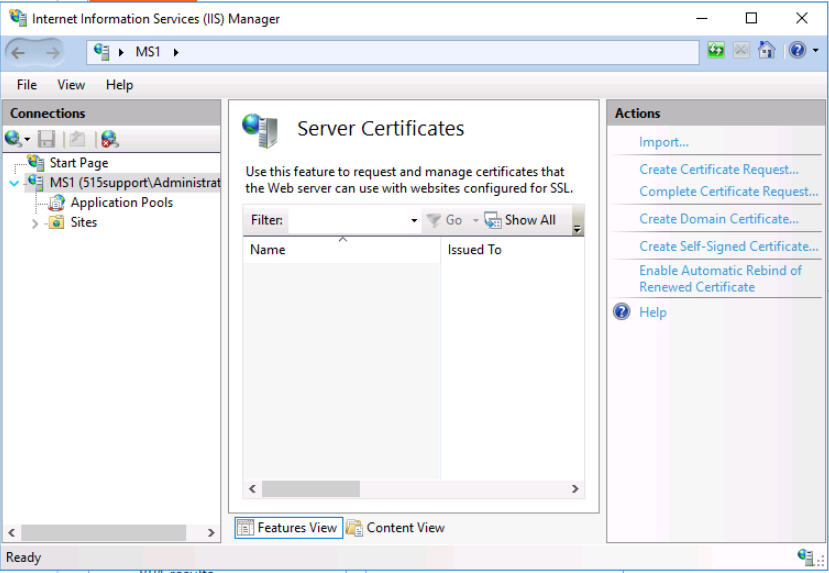
We begin with server manager, navigating to Tools > Internet Information Services (IIS) Manager. In the connections pane, we select the MS1 server icon. In the Home pane, we open the Server Certificates applet.
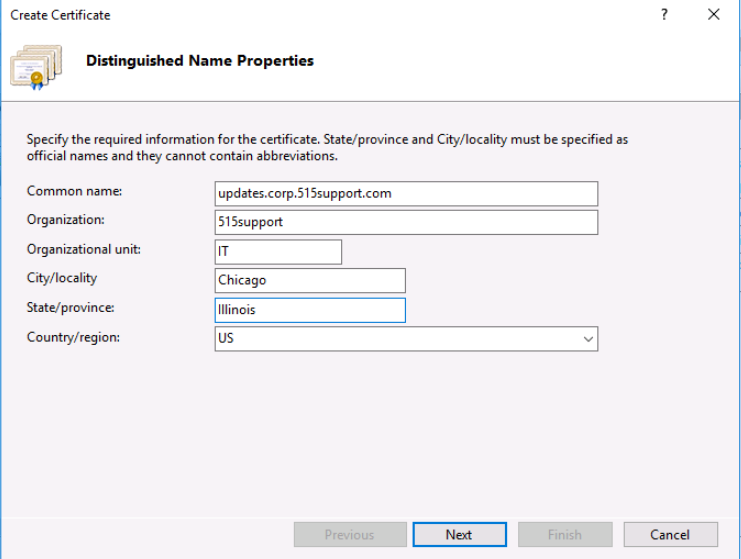
Next, we select Create Domain Certificate using the following responses:
- Common Name: updates.corp.515support.com
- Organization: 515support
- Organizational Unit: IT
- City/locality: Chicago
- State/province: Illinois
- Country/region: US
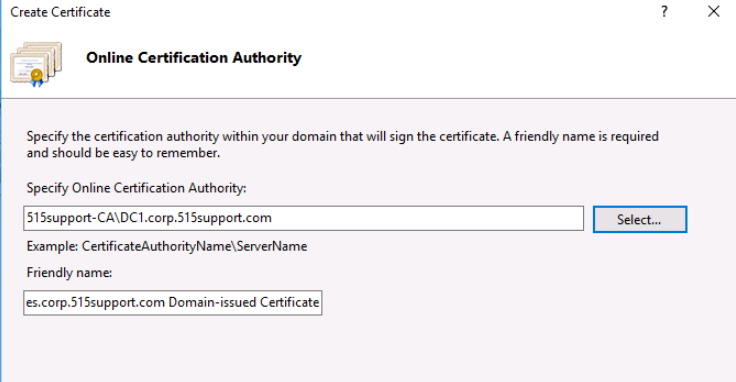
In the next pane we do the following:
- select 515support-CA for "Specify Online Certification Authority"
- type in updates.corp.515support.com Domain-issued Certificate uner the Friendly name box
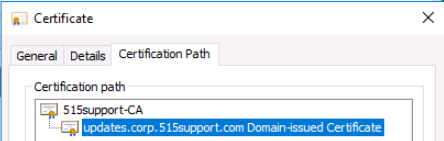
When double-clicking on the updates.corp.515support.com Domain-issued Certificate, we can see
- The general tab states the validity period is two years, and
- The certification path tab states the root path is 515support-CA
Configure HTTPS
Task: Bind the certificate to a secure HTTP port on the default website. The certificate is now used to guarantee the identity of this web site, ensuring a secured connection.
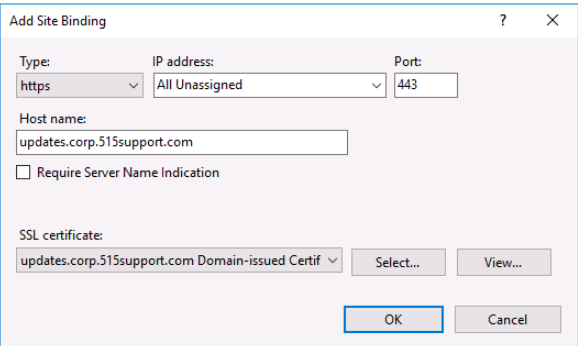
Moving back to the IIS Manager, we expand the sites node on the server to show the Default Web Site node. Right-clicking it allows us to select Edit Bindings. After selecting it and clicking the Add button we do the following steps:
- Under type we select HTTPS
- In the dialog box we type in the hostname: updates.corp.515support.com
- From the SSL certificate drop-down list, we select updates.corp.515support.com Domain-issued certificate
- Finish by selecting OK
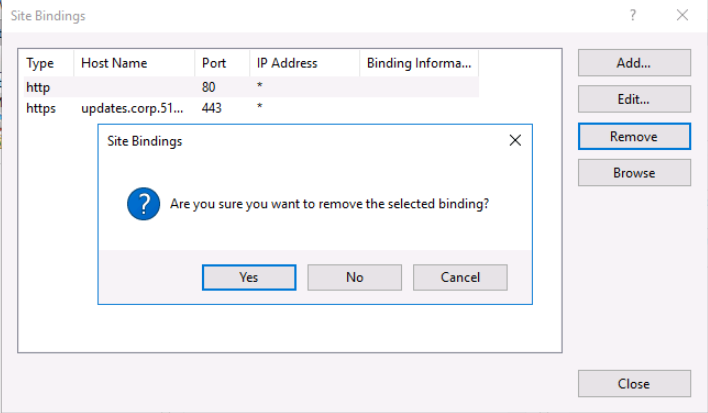
In the site bindings dialox box, we select HTTP and then select Remove to delete the HTTP from the list so that we do not permit unsecured HTTP connections to the web server.
Configure Authentication Policy
Task: Configure the web site to require Basic authentication, which uses plaintext authentication.
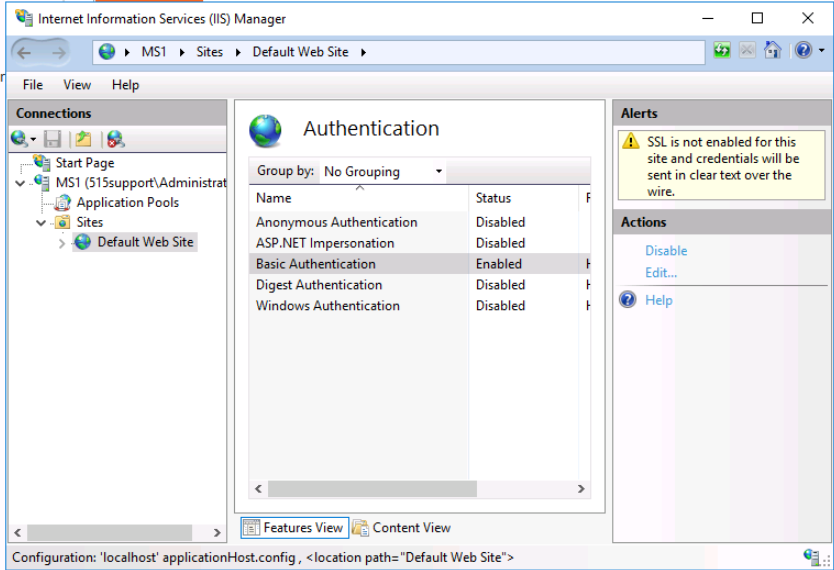
In the IIS Manager, we select the Default Web Site node, then open the Authentication applet in the Home pane. From here, we disable Anonymous Authentication and enable Basic Authentication.
Note: Basic authentication submits plaintext credentials, which (even with the protection of a TLS tunnel) is a risk. On an intranet, there'd be no reason not to use Windows authentication, which is much more secure. Here, we want to observe the credentials submitted by the client, however, and Kerberos makes that a bit more complex.
Test Web Credentials
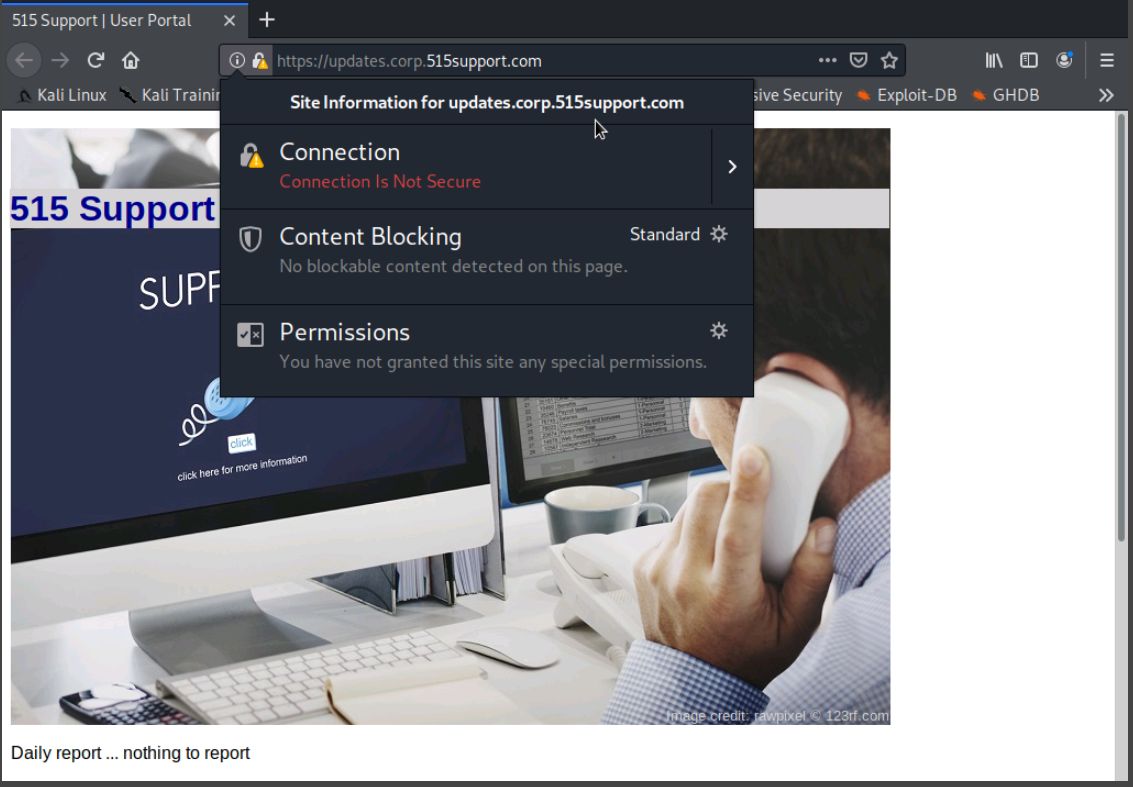
Once we accept the connection, we are prompted with a dialog box requiring authentication. After signing in, we can see the padlock icon on the top left that shows displays the text "Connection is Not Secure"
Task: On the Kali virtual machine, test the authenticated connection to the https://updates.corp.515suppor... web site.
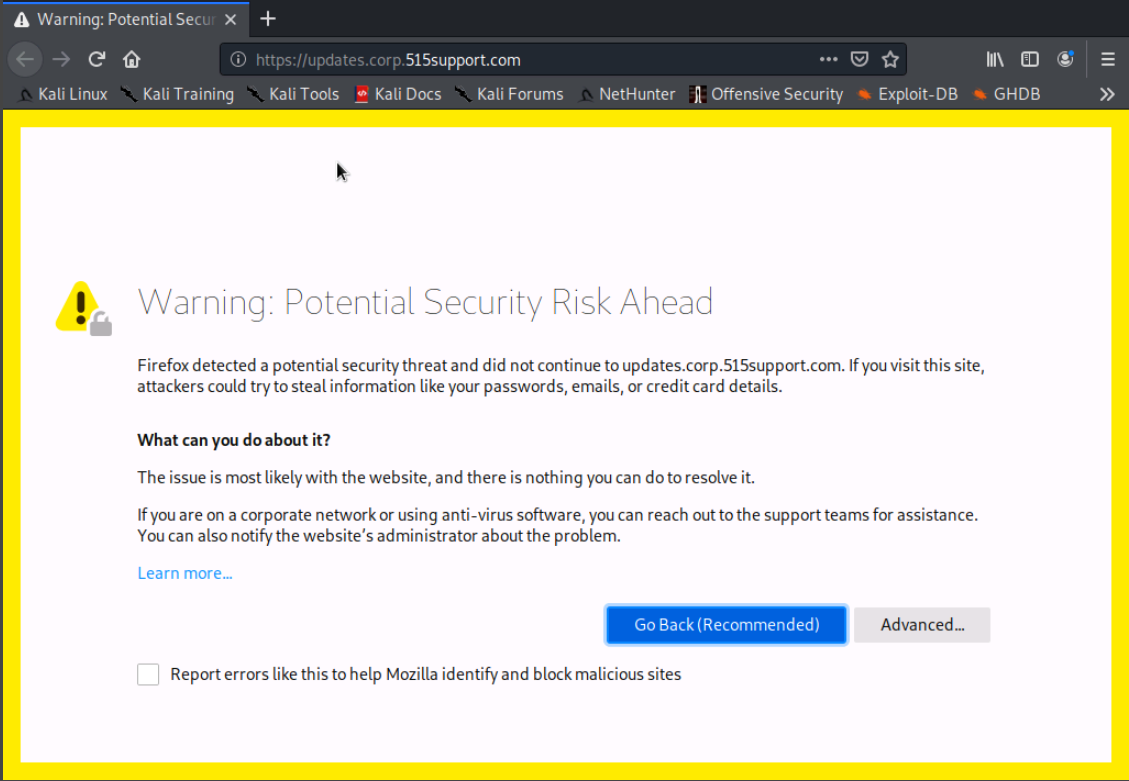
Moving over to the Kali VM, we open Firefox ESR and attempt to connect to the web site using HTTP. The connection attempt fails.
We then retry the connection but this time we use HTTPS. and the connection is succesful.
We receive a warning because the site attempts to identify itself with invalid information. We accept the connection anyway because we know the certificate is issued by a trusted, internal CA.
Next, we right-click the IPv4 node, select New Scope... and enter the following information:
- Name: Enter Special Project
- Start IP address: Enter 10.2.0.10
- End IP address: Enter 10.2.0.20
- Subnet Mask: Enter 255.255.255.0
- Configure DHCP Options: Select Yes, I want to configure these options now
- Router: Enter 10.2.0.1 and then select Add
- Activate Scope: Select Yes, I want to activate this scope now
- Select Finish to complete the wizard.
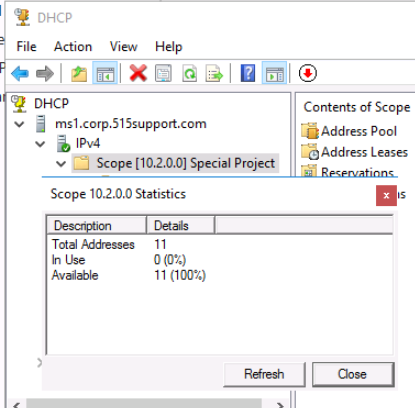
Once the steps are complete, we select the scope [10.2.0.0] Special Project Scope node, and then right-click it and select Display Statistics.
This information can help us determine if our IP address allocations are as expected. If we see fewer or more than expected, you may have a DHCP incident. In this instance, we expect to see 11 Total Addresses.
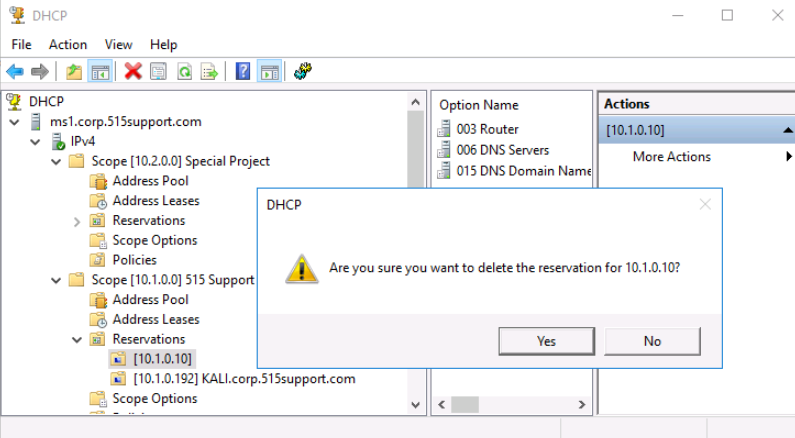
After closing the statistics box, we expand the scope [10.1.0.0] 515 support scope and select the Reservations node. After selecting the 10.1.0.10 reservation in the left-pane, we right click 10.1.0.10 and select properties. We copy the MAC address and click cancel.
Next we delete that CentOS reservation.
Next, we:
- Select the Reservations node in the Special Project scope.
- Right-click the Reservationsnode
- Select New Reservation
- In the New Reservation box we enter the following information
- Reservation Name: LX1 (CentOS)
- IP address: 10.2.0.15
- MAC address: Paste from the clipboard or Notepad document
- Description: LX1 Consultant - special project
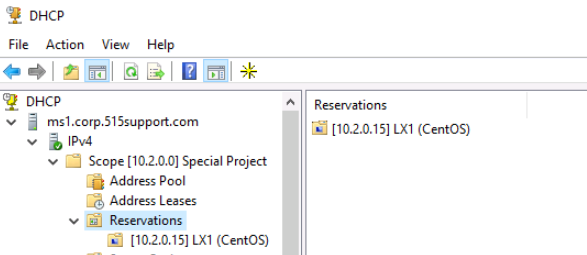
- Select Add, and then Close the New Reservation box.
The new scope is visible under Reservations
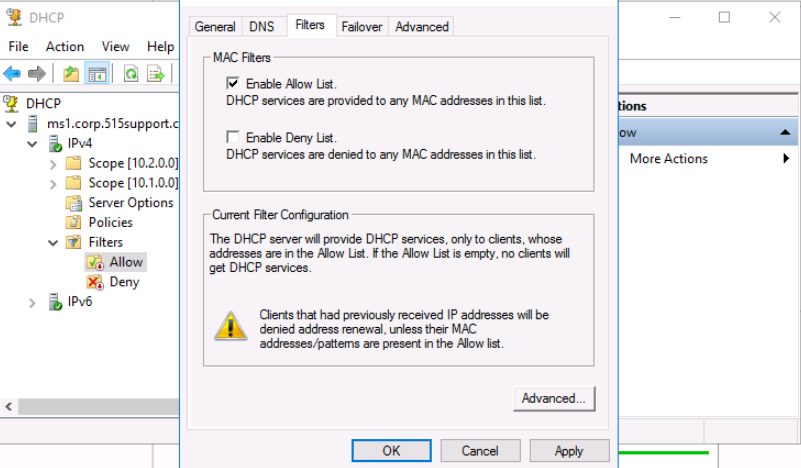
Going back to the IPv4 node, we search for the Filters node and right click it to add New Filter. We paste in the MAC address copied from the LX1 CentOS machine and enter LX1 consultant computer in the Description field.
Back to the IPv4 node again, we right-click it and select properties. Under the filters tab, we Enable Allow list and select apply.
DHCP Security
Task: Build a small, isolated network segment to support a new research and development team at 515support. Configure a new DHCP scope with additional security settings to help protect the segment.
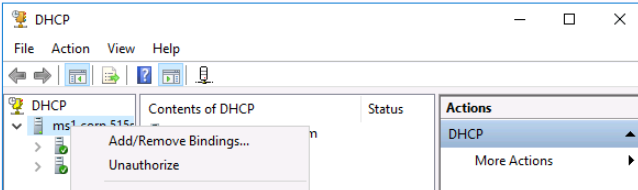
Switching back to our MS1 VM, we select DHCP from Tools in Server Manager and then select the ms1.corp.515support.com server icon and right click it to display what option is offered in the context menu regarding the Active Directory DHCP Authorization status for this server.
Conclusion
The lab included two parts, the first part involved configuring an internal Windows web server for HTTPS connectivity, and the second part included configuring DHCP security settings.
The lab activity provided hands-on experience in configuring and testing network security mechanisms that can be used to protect a network against potential network attacks.
Through this lab activity, the importance of configuring and implementing security measures, such as requesting a server certificate, configuring HTTPS, configuring authentication policy, and testing web credentials, was highlighted.
0 Comments Add a Comment?