
Manage Storage Stack
In this lab, you resize an existing logical volume, add LVM resources as necessary, and then add a new logical volume with a persistently mounted XFS file system on it
Outcomes
- Resize the serverb_01_lv logical volume to 768 MiB.
- Create the new serverb_02_lv logical volume with 128 MiB with an XFS file system.
- Persistently mount the volume on the /storage/data2 directory.
On the serverb machine, the serverb_01_lv logical volume mounted on the /storage/data1 directory is running out of disk space and needs to be extended to 768 MiB. We must ensure that the serverb_01_lv LV remains persistently mounted on the /storage/data1 directory.
The serverb_01_lv LV is present on the serverb_01_vg volume group. Unfortunately, it has insufficient space to extend the existing logical volume. A 512 MiB partition exists on the /dev/vdb disk. We'll create a new partition using the successive 512 MiB size on the /dev/vdb disk.
Create the serverb_02_lv LV with 128 MiB. Create the XFS file system on the newly created volume. Mount the newly created logical volume on the /storage/data2 directory
Create and Initialize the Partition as a Physical Volume
As the root user, we'll create the 512 MiB partition and set the lvm partition type.

Now, we'll register the new partition with the kernel and initialize the partition as a PV.

Extend the serverb_01_vg Volume Group to use this Partition
To extend the serverb_01_vg VG we'll use the new /dev/vdb2 PV.

Extend the serverb_01_lv Logical Volume
We'll extend the serverb_01_lv LV to 768 MiB. Alternatively, we can also use the lvcreate command -L +512M option to resize the LV.
Then, we'll extend the XFS file system consuming the remaining space on the LV.
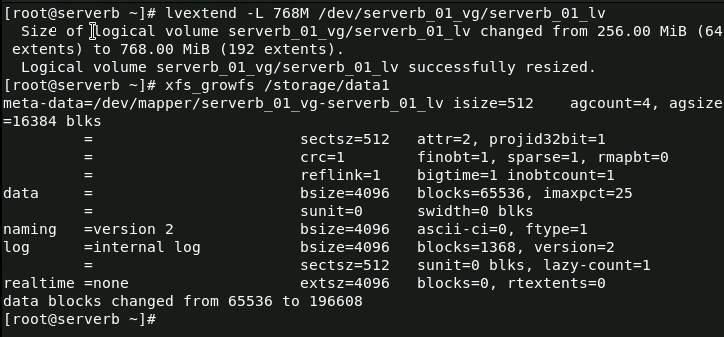
Note: Thexfs_growfs command introduces an additional step to extend the file system. An alternative would be using the lvextend command -r option.
Create the New serverb_02_lv Logical Volume and add an XFS File System and Mount it Persistently to /storage/data2 Directory
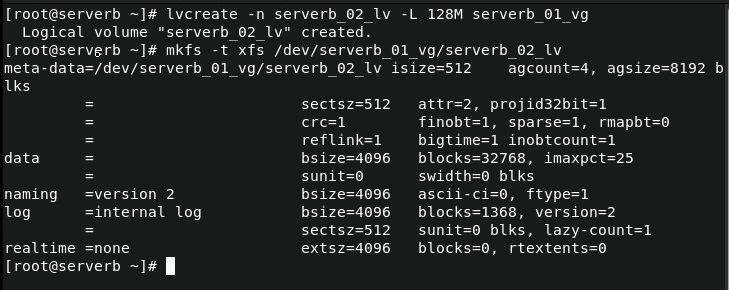
We'll start by creating the serverb_02_lv LV with 128 MiB from the serverb_01_vg VG and the creating the xfs file system on the serverb_02_lv.
Now, we'll create the /storage/data2 directory as the mount point with the mkdir command. Next we use vim to add the bottom line to the etc/fstab file.

Next, we'll update the systemd daemon with the new /etc/fstab configuration file and mount the serverb_02_lv.

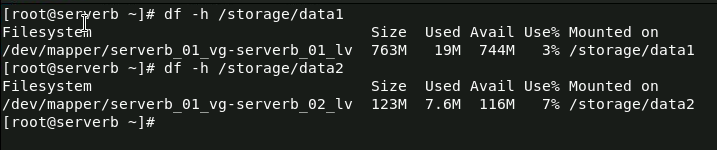
Verify the Newly Created LV is Mounted to the Desired Size
Let's start by using the df command to verify the serverb_01_lv and the serverb_02_lv size.
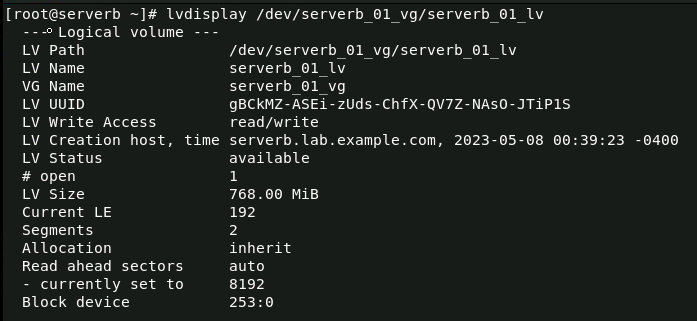
Now, let's verify the serverb_01_lv LV details.
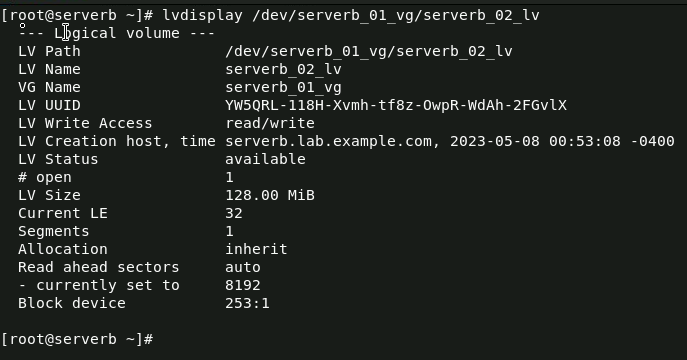
And the serverb_02_lv LV details.
Conclusion
During this lab, we were able to resize an existing logical volume, create a new logical volume with an XFS file system, and persistently mount it on the /storage/data2 directory. To achieve this, we had to create a new partition on the /dev/vdb disk, initialize it as a physical volume, and extend the serverb_01_vg volume group to use this partition.
We then extended the serverb_01_lv logical volume to 768 MiB and extended the XFS file system on the LV. Finally, we created the new serverb_02_lv logical volume with a 128 MiB XFS file system and mounted it persistently on the /storage/data2 directory.
We confirmed that both serverb_01_lv and serverb_02_lv were mounted to the desired sizes using the df command.
0 Comments Add a Comment?