
Manage Basic Storage
In this lab, we'll create several partitions on a new disk, formatting some with file systems and mounting them, and activating others as swap spaces.
Outcomes
- Display and create partitions with the parted command.
- Create file systems on partitions and persistently mount them.
- Create swap spaces and activate them at boot.
Create and Configure a Backup Partition
The serverb machine has several unused disks. On the first unused disk, create a 2 GB GPT backup partition. Because it is difficult to set an exact size, a size between 1.8 GB and 2.2 GB is acceptable. Configure the backup partition to host an XFS file system.
We'll begin by identifying the unused disks. The first unused disk, /dev/vdb, does not have any partitions.
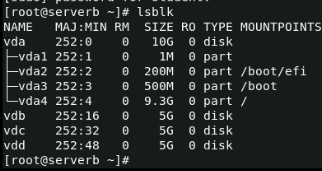
To confirm that the /dev/vdb disk has no label we'll run the parted command.

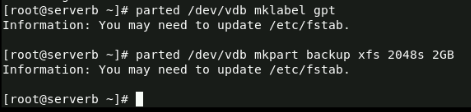
Next, we'll define the GPT partitioning scheme, and create the 2 GB backup partition with an xfs file-system type. We'll start the partition at sector 2048.
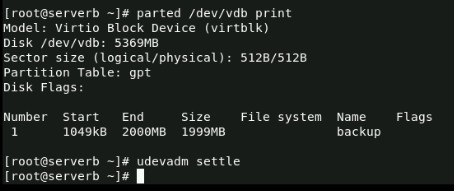
Now we'll confirm the creation of the backup partition and then run the udevadm settle command. This command waits for the system to detect the new partition and to create the /dev/vdb
Format the Backup Partition and Mount it to /backup
In this section, we'll format the 2 GB backup partition with an XFS file system and persistently mount it to the /backup directory.
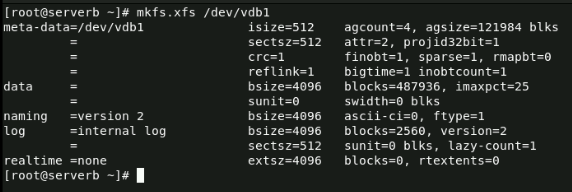
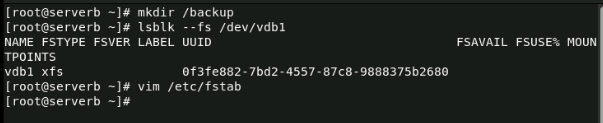
We'll begin by formatting the /dev/vbd1 partition.
Next, we'll create the /backup mount point and before adding the new file system to the /etc/fstab file, we'll retrieve its UUID and edit the /etc/fstab file and define the new file system
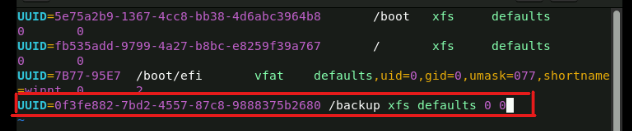
Now, we'll force the systemd daemon to reread the /etc/fstab file and manually mount the /backup directory to verify our work and confirm that the mount is successful.

Create Two GPT Partitions and Configure the file-system Types to Host Swap Spaces
On the same disk, we'll create two 512 MB GPT partitions called swap1 and swap2 and configure the file-system types of the partitions to host swap spaces.
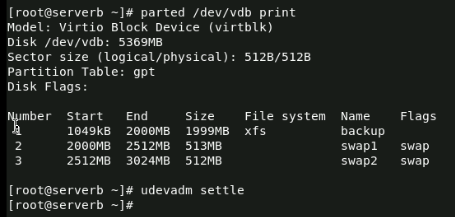
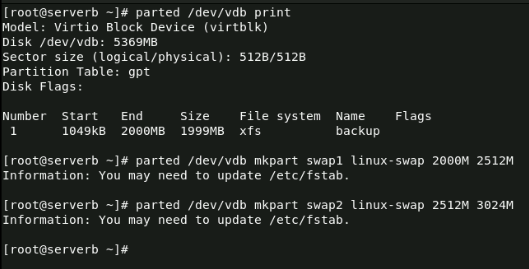
We'll retrieve the end position of the first partition by displaying the current partition table on the/dev/vdb disk.
We'll use that value as the start of the first 512 MB swap1 partition. We'll set its type to linux-swap and use the end position of the first partition as the starting point. The end position is 2000 MB + 512 MB = 2512 MB.
Then, we'll create the second 512 MB swap2 partition and set its type to linux-swap as well. We'll use the end position of the previous partition of 2512M as the starting point and set the end position as 2512M + 512M = 3024M

Now, we'll display the partition table to verify our work and then run the udevadm settle command. Once the system registers the new partitions, this command created the device files.
Initialize the Partitions and Configure Them to Activate at Boot with swap2 as Preferred
Here, we'll initialize the two 512 MiB partitions as swap spaces and configure them to activate at boot and set the swap space on the swap2 partition to be preferred over the other.
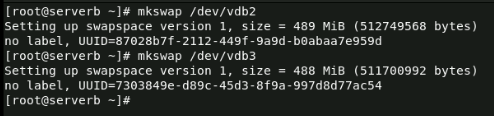
We'll use the mkswap command to initialize the swap partitions. Note the UUIDs of the two swap spaces because we'll need that in the next step. The lsblk --fs command can be used to retrieve the UUIDs if necessary.
Next we'll edit the /etc/fstab command using vim and define the new swap spaces. To set the swap space on the swap2 partition to be preferred over the swap1 partition, we'll give the swap2 partition a higher priority with the pri option.
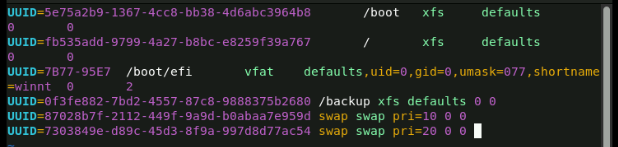
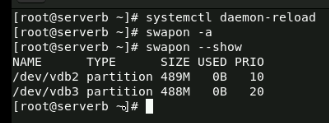
Now, we'll force the systemd daemon to reread the /etc/fstab file and then activate and verify the new swap spaces.
Confirm the System Automatically Mounts the First Partition and that the System Activates the Swap Spaces
To verify our work, we'll
- Reboot the serverb machine
- Confirm that the system automatically mounts the first partition onto the /backup directory
- Confirm that the system activates the two swap spaces.
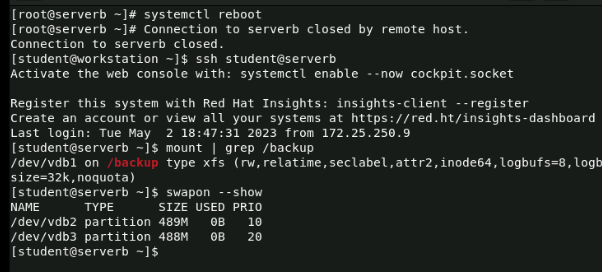
To complete the above objective's, we'll run commands to:
- Reboot serverb
- Log back in as the student user
- Very the system automatically mounts the /dev/vdb1 partition onto the /backup directory
- Very the system activates both swap spaces
This lab provided a comprehensive guide on managing basic storage in a Linux environment. We learned how to create partitions on a new disk, format them with different file systems, and activate them as swap spaces.
Additionally, we successfully created a 2 GB backup partition with an XFS file system and mounted it persistently to the /backup directory.
Lastly, we created two 512 MB swap partitions, initialized them, and configured them to activate at boot with the swap2 partition as preferred.
0 Comments Add a Comment?