Configure a SOHO Router
In this scenario, we have purchased a router for our work-from-home office and we need to display common settings and set basic configurations.
Connect to the Router
We will connect to the new small office/home office (SOHO) router to view available settings and options. First, we'll connect by using SSH, and then we'll establish an HTTP connection using an Ubuntu VM.
We'll select the Network Manager Icon in the top right > Select Ethernet (eth1) Connected > Wired Settings and select the gear icon associated with Ethernet 1 (eth1). The eth0 connection is disabled for this activity.
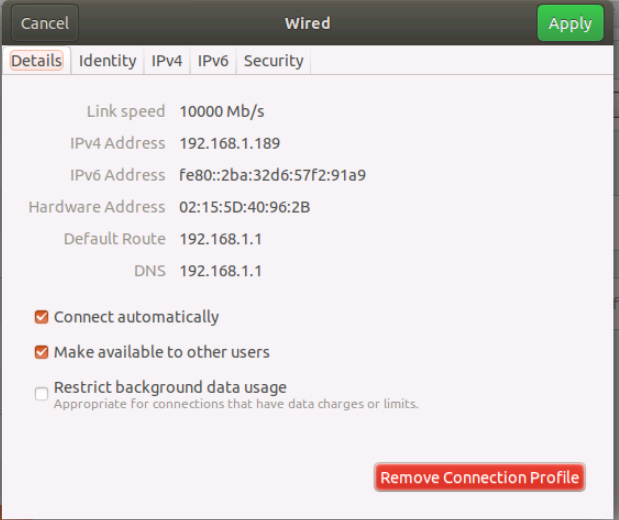
When we click on the IPv4 tab, we can see that Automatic (DHCP) is enabled for eth1.
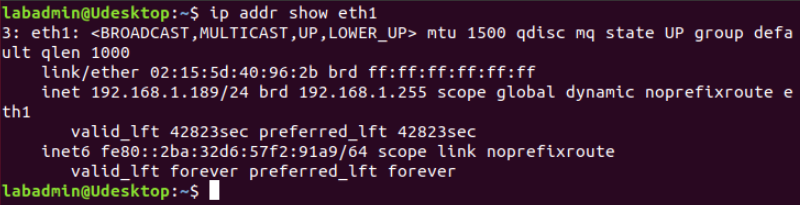
Now, we'll use the terminal and the following command to display and document the IPv4 address for eth1.
Running the following command will establish a remote SSH connection to the OpenWRT router: ssh root@192.168.1.1
The Secure Shell (SSH) is a common network administration tool. It provides an encrypted command line connection to remote network devices. Most platforms other than Windows use SSH connectivity (it can be added to Windows). This command initiates an SSH connection as the root user to a remote destination of 192.168.1.1. The root user is the Linux administrative account.
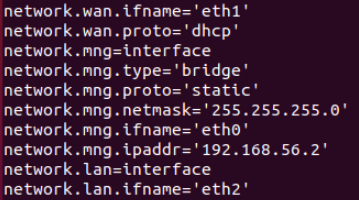
Running the uci show network command displays basic network information about the router. Two things of interest are what are labelled as network.wan.ifname, and network.lan.ifname.
Note: The ifconfig command is a standard way of displaying IP address configurations on Linux devices. The ip addr command is a newer method. Just something to keep in mind.
Next, we'll establish a remote web-based connection to the OpenWRT router by typing in http://192.168.1.1 in the Firefox Browser.
We won't be using an HTTPS connection, as the OpenWRT router is currently not configured to accept these connections. Unlike the SSH connection, this HTTP connection is not secured. Traffic between the Ubuntu workstation and the router could be intercepted and read by tools such as Wireshark. However, the connection is easier to establish and the interface is more intuitive.
Set an Administrative Password
The SOHO router has a blank administrative password. We will configure a new password.
We start by clicking login and leaving the password field blank. When we're in, a No Password set! warning appears along with Go to password configuration...
We'll click that and set Pa$$w0rd as the password. Once it's set, we'll logout and test the new password to confirm it works.
Display Common Configurations
We will display connections that are common to many routers and other network devices.
Notice the menu bar at the top of the OpenWRT configuration web page. This bar contains three menus: Status, System, and Network. It also contains a Logout option.
We'll use these menus to browse to the following settings in the browser. The current page displayed is Overview from the Status menu. This page provides basic information. We can see that the kernel displayed for the router 4.14.171 and the client that has an IP configuration leased from the OpenWRT DHCP server is Udesktop.

The Dynamic Host Configuration Protocol (DHCP) leases IP address configurations to network clients, such as the Ubuntu Desktop virtual machine.
We'll cycle real through the different options and see what they have to offer:
Status
- Firewall - displays basic firewall settings.
- System Log - displays connections, leases, and other system activity
System
- System - displays general system options
- System/Logging/External system log server - we can configure this router to forward its log files to a central server
- System/Time Synchronization/NTP server candidates - The router will attempt to synchronize its time with these servers
- Administration - This is where we can set the router password
- Administration/SSH Access - We can use this tab to control SSH connectivity to the router. We can see that the port numer is set to 22 (The standard port number for SSH)
- Administration/SSH Access/Interface - We'll set this to lan so that we only permit SSH connectivity from address connected to the LAN interface, then click Save and Apply.
We'll use the terminal to SSH into 192.168.1.1, enter the password, and we're in.
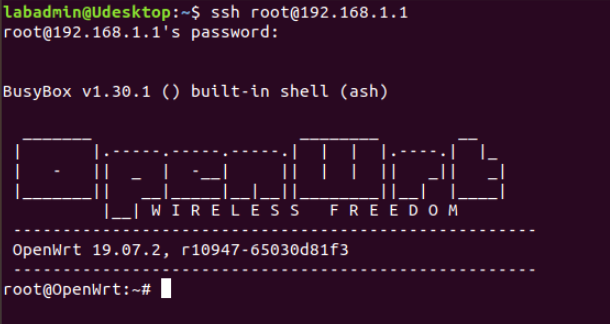
Typing exit allows us to end the connection.
Back at the Firefox window, we'll select WAN from the interface menu and save and apply. When we retry the SSH connection, it fails. We'll switch it back to LAN for now.
From the System menu, we select Backup / Flash Firmware. Click Generate archive to back up the router's current configuration and save it.
From the Network > Interfaces menu, we see three interfaces displayed, they are:
- LAN
- MNG
- WAN
Moving on to Network > DHCP and DNS > Static Leases, in this interface we can set a reserved IP address configuration. When the specified DHCP client computer attempts to lease an IP address configuration it is identified by its MAC address and given a reserved IP address.
Use Diagnostics to review IP address information
Next, we'll review public and private IP address information.
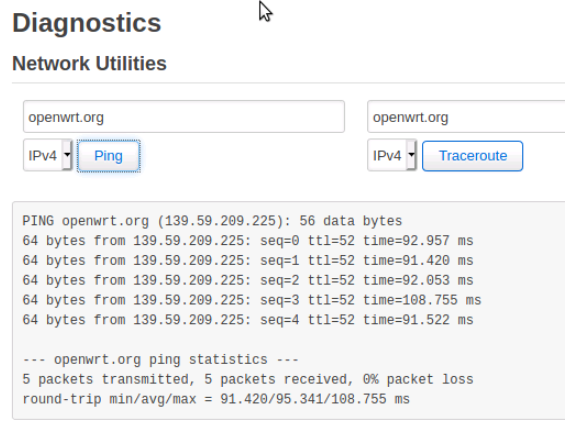
On the OpenWRT router we navigate to Network > Diagnostics and we can see three network tests can be run from this window, they are:
- Ping - tests network connectivity
- Traceroute - displays the path to the destination
- Nslookup - tests name resolution
Navigating over to Network > Interfaces and we can see the configurations of the different interfaces. For example eth2 has a private ip address starting with 192.
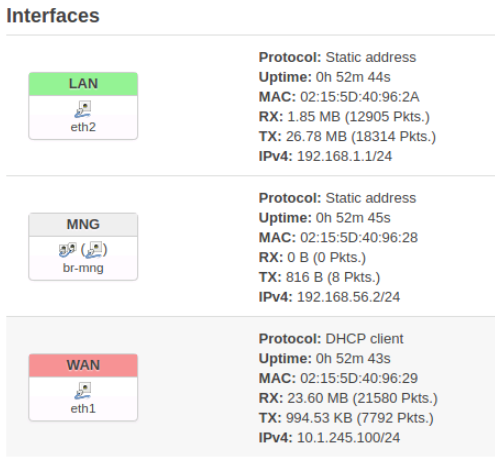
Internal networks such as a home or small office LAN use reserved or private IP address ranges. Web sites and other Internet presences use public IP addresses. There are three private (internal) IP address ranges, and the displayed IP address for LAN should be within one of these:
- Reserved Class A 10.x.y.z
- Reserved Class B 172.16.x.y - 172.31.x.y
- Reserved Class C 192.168.x.y
Moving onto Network > Diagnostics we'll run ping openwrt.org test from the interface. We can see the ip address displayed is a public ip for the openwrt.com web site.
Conclusion
Configuring a small office/home office (SOHO) router is a necessary task for setting up a work-from-home office. In this lab activity, we connected to the router using SSH and HTTP, and displayed common settings and configurations. We were able to set an administrative password, view basic network information, configure SSH connectivity, and set a reserved IP address configuration. Additionally, we reviewed public and private IP address information using the Diagnostics menu.
0 Comments Add a Comment?